This post originally appeared on Medium.com.
I like scanners. See, at one time I was really into books. But after a decade or two, you come to the conclusion books take physical space. Lots of it. So when my tax guy showed me his Fujitsu ScanSnap I was hooked. Mine ingested most loose papers, statements and documents. This cleared a shelf or two. I also scanned many books by sawing their spines off, and feeding them to the ScanSnap fifty pages or so at a time. It works great, and this cleared several more feet of shelf space.
However, there are some books I just can’t bear to saw up to feed to a sheet-feed scanner, and this is the niche the Czurtek ET16 falls into. I also had fantasies of using it to replace my slow, clumsy flatbed scanner. So, I signed up to the Indiegogo campaign, for $234.
First, let give big kudos to Czurtek for delivering within a month of the their promised date. This is incredibly good for such a complicated crowdfunding project!
The Hardware
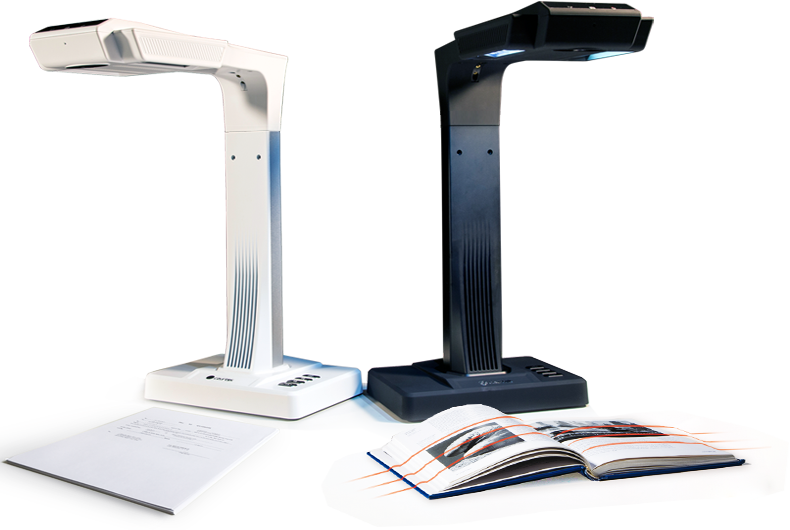
The ET16 scanner comes nicely packaged, but it needs some minor assembly — you attach the scan head to its base. They pack a very nice screwdriver for this task, and some rubber stickers to hide the screws (hint: you’re not meant to take it apart).
Then the first realization hits: This product takes a lot of space. You should plan on a square meter or so on your desk to set this up and comfortably use it. And when you’re done, you have a fairly large device that does not neatly fold up, so you’ll need half a cubic meter to store it.
The scanner itself feels solid and well made. It’s packed with both desk and foot switches to operate it as you scan through your books. It has a nice LCD on top to monitor your scan and progress. A black rubber mat for placing your artwork is provided. Finally, it uses three lasers to determine the curvature of the book pages, so it can flatten them out in software.
The Software
Um, the software. Yeah. So this part is awkward. Fortunately, it might get better over time, but it took me a good hour or so to figure out how to use it, and I’m a professional software engineer who’s used to arcane technology. [Note: I’ve only tried the USB/Windows software, I have not tried the WiFi/Web usage.]
The software does little to guide you through the workflow of using the scanner. It was developed using some sort of alien UI toolkit that looks nothing like the native Windows it runs on. It also doesn’t look like a web page, or a Mac, or a phone, or anything else you’ve ever used. It insists on running as an admin process, which is creepy. Normally providing step-by-step instructions is beyond the scope of a review, but I found using this software so convoluted I’ll do it as a service to others struggling to figure it out.
Scanning documents
Getting the scanner to work at all is the first challenge. There’s no USB driver for the device, so Windows complains when your first plug it in. After much trial and error, I discovered that you must:
- Plug in the scanner into your PC’s USB port
- Turn on the scanner
- Launch the app
- Turn the scanner off then back on
After these steps, the software finally recognizes the scanner. Getting the “Visual Projector” to work is a good test that it’s finally operating.
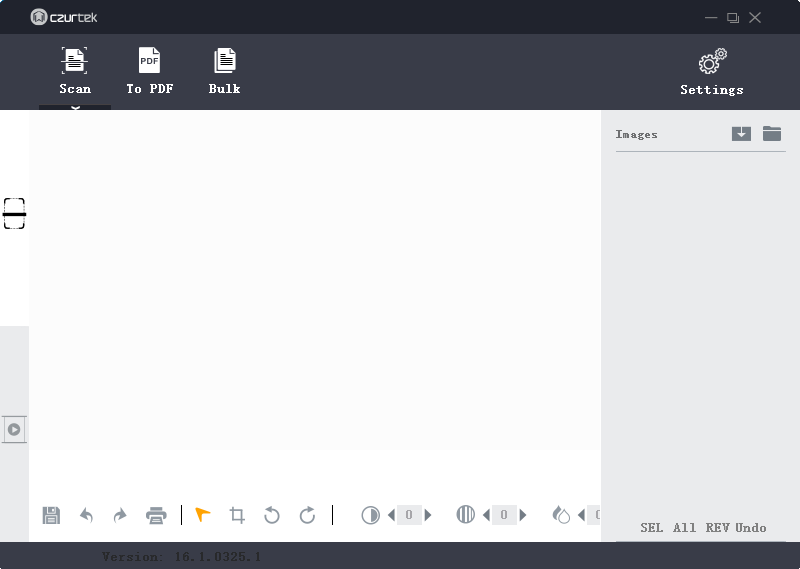
Figuring out the app’s controls is the next challenge. On the far left edge of the application window, the two cryptic icons switch between “Scanner” (top) and “Visual Projector” modes. Now I’ll walk you through how I actually managed to get some documents scanned. First, select the “scan” button (the rectangle with the horizontal line through it on the far left side).
See that black line underneath the “Scan” page icon at the top left? Click on it. Surprise! It’s a pop-up menu for selecting gray/B&W/color/seal (seal??). Select the type of scan you want. Click on the Scan page icon at the top left, and choose if you’re scanning flat artwork or a book that’ll need to be “flattened” in software. Now you’re ready to start scanning. Position artwork, press button (or foot pedal) wait for the red LED on the top of the scanner to turn on and back off, repeat.
You’re able to scan a new page every few seconds, but the PC software (even on my beefy 4GHz multi-core PC) does not keep up. After you’re done scanning, watch the “X/Y” counter on the top right of the scanner’s LCD screen. You need to wait for the first number (the “X”) to go to zero and then wait for the last page (page “zero”) to be transmitted before you’re actually done scanning. There’s no other progress indicator telling you how far behind the app is, or when it’s completely finished.
When you’re sure all the scanned pages have made it to the PC, hit the Escape key to exit scanning mode (I didn’t see any other way to do this? More hidden UI). At this point, the app created a bunch of JPEG files listed on the right side of the app. These are buried in the Application install folder (hint: this is probably why it insists on running as admin. Earth to Czurtek: Next time aim for the user’s Documents folder, OK?)
On the right side of the app, you’ll see a list of image files. At the bottom right, those cryptic letters (“SEL All REV Undo”) are actually (surprise!) buttons. Click on “All” so all the images are selected with checkboxes.
Now you can click the “To PDF” button at the top left, then the “PDF” to the right of that, and it’ll pop open a save dialog and allow you to create a PDF file. Note the JPEG files are kept around; you’ll need to go into the application folder (as administrator!) to delete them. Finally, to start another document I found it easiest to simply quit the app and re-launch it. Otherwise, the image files are still there from the last document scanned.
Results
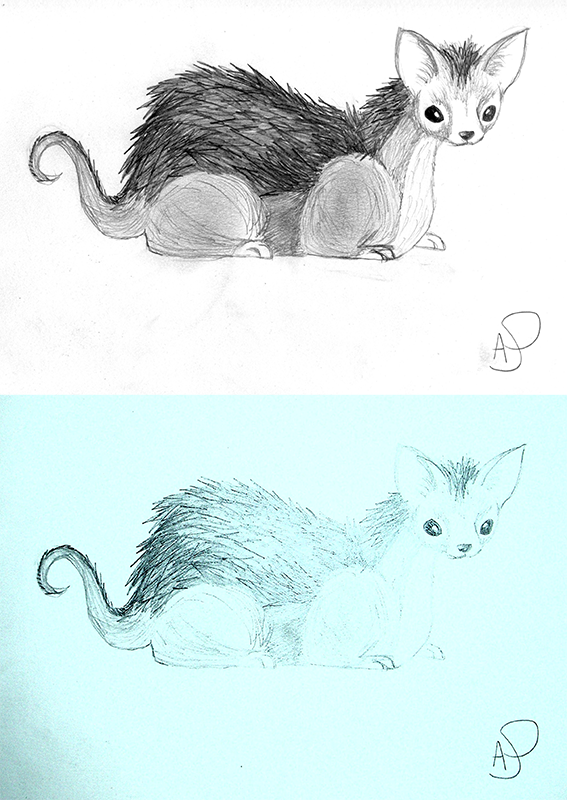
Well, I’m keeping the flatbed scanner. The lights on the Czurtek aren’t bright enough to light documents completely evenly. And they’re too close to the camera. For matte documents this doesn’t matter much. But when I tried scanning some of my daughter’s pencil artwork, the lights reflected off the graphite back into the camera lens, producing terrible results. For artwork or photography, the results from the Czurtek are not better than a careful snapshot with a good cellphone camera.
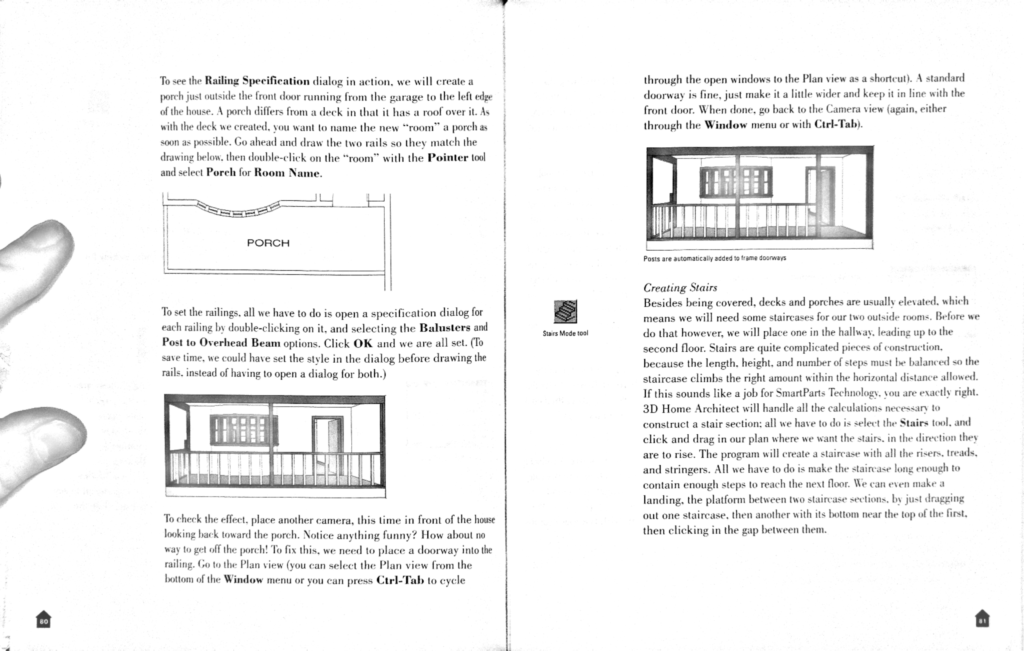
For B&W documents on matte paper, the Czurtek does a better job. I tried some book pages, and it does a capable job of flattening the pages, although some picked up a bit of edge blur along the way. If you’re trying convert a book with text and diagrams (and you don’t want to saw the spine off) the Czurtek can do the job.
One case where the Czurtek did a wonderful job was some old large tractor-feed printouts (those were a thing 30 years ago). The Czurtek had no problem with the large page size, and did a great job turning them into PDFs once I figured out the arcane workflow.
I have only used the device with their application on a PC. I have not tried their hosted application over WiFi.
To Sum Up
- It takes up a lot of space, both to use and to store when not in use.
- OK scans, good for text and line art diagrams.
- Not so good for photos, artwork, or glossy printed material
- Reasonable job of scanning books and other bound material
- Great for larger documents too big to fit in a sheet-feed or flatbed scanner.
- The application software, um, well… let’s just say it can only get better.


