How Accurate is Your 3D Print?
I Tested Several Services to Find Out
Update January 2025: Added a few more prints from Jawstec and JLC3DP.
Update September 2024: Several of the entries in this post referred to services (e.g., Shapeways) that are no longer in business, or 3D printing tech that is now obsolete. I’ve archived these old reviews elsewhere, but removed them from this post for brevity. Even though Shapeways is no longer around, I left the story about their process variations as a useful story of what can happen even with a particular process at a specific vendor. This post has been updated with reviews of several contemporary services.
Decades ago, if you wanted to create your own printed circuit board, you had to make it yourself. This was quite involved – you bought a copper plated blank board, created the circuit patterns on it with resist (tape, rub-on patterns, or Sharpie), then dunked it in noxious chemicals to etch the unmarked copper away. It was also up to you to drill the holes. Then you tracked down problems because too much (or not enough) copper was dissolved, opening or shorting your circuits. It was messy, tedious and frustrating.
Here in the future, all those problems are solved. You design the board in a CAD program, then the Internet whisks the design to a far-off fabrication house. A few weeks later your boards arrive, perfectly manufactured with solder masks, silk-screen markings, plated through holes – things you’ll never get making them at home.
I do some amount of 3D printing, but I have no desire to own a 3D printer. Running your own 3D printer still feels like those early days of homemade circuit boards. The tedious details of bed leveling and heating, getting the model to stick in place, support sprues, filament moisture content, speed settings all have to be carefully looked after to get good results. I prefer the modern circuit board model for 3D prints – send the model off to a factory with equipment and materials you’ll never afford, and get your polished results back in the mail.
When I started ordering 3D prints, I had a basic question: when designing two parts that fit together, how much space do you need to leave between them to fit properly? To research this, I designed a set of fit-testing sets and printed them with various processes to see what sort of tolerances are necessary. So far I’ve tried nine different prints, and (unlike circuit boards) the results vary considerably.
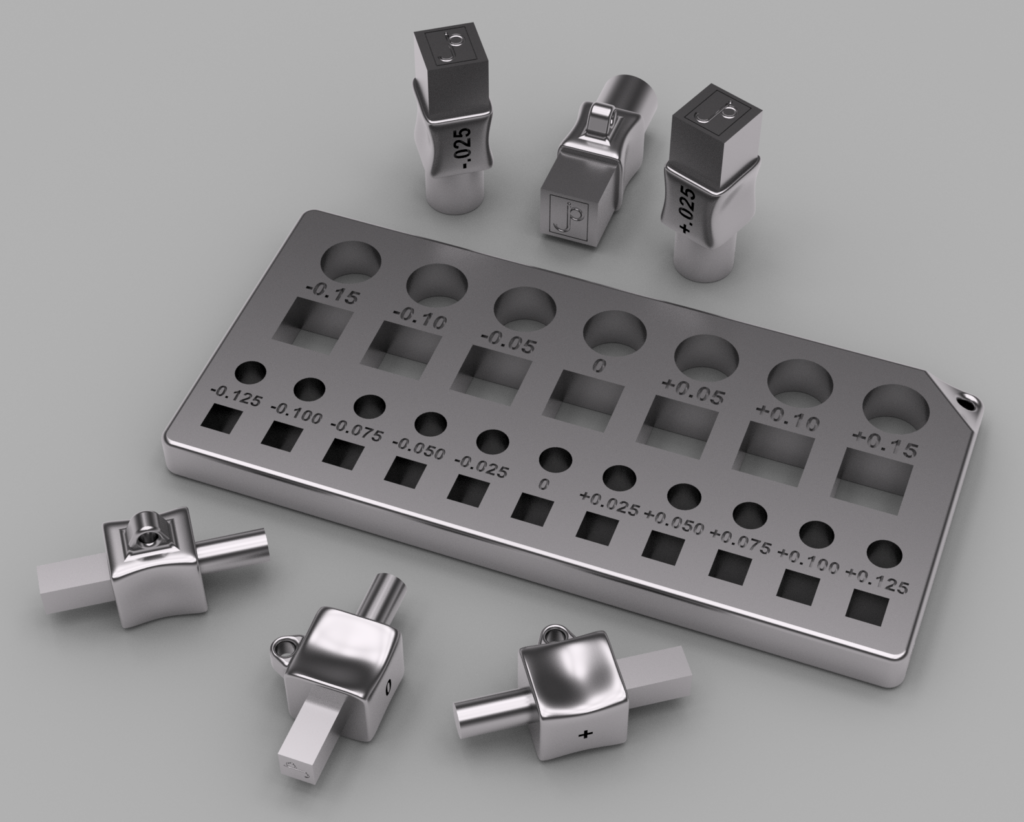
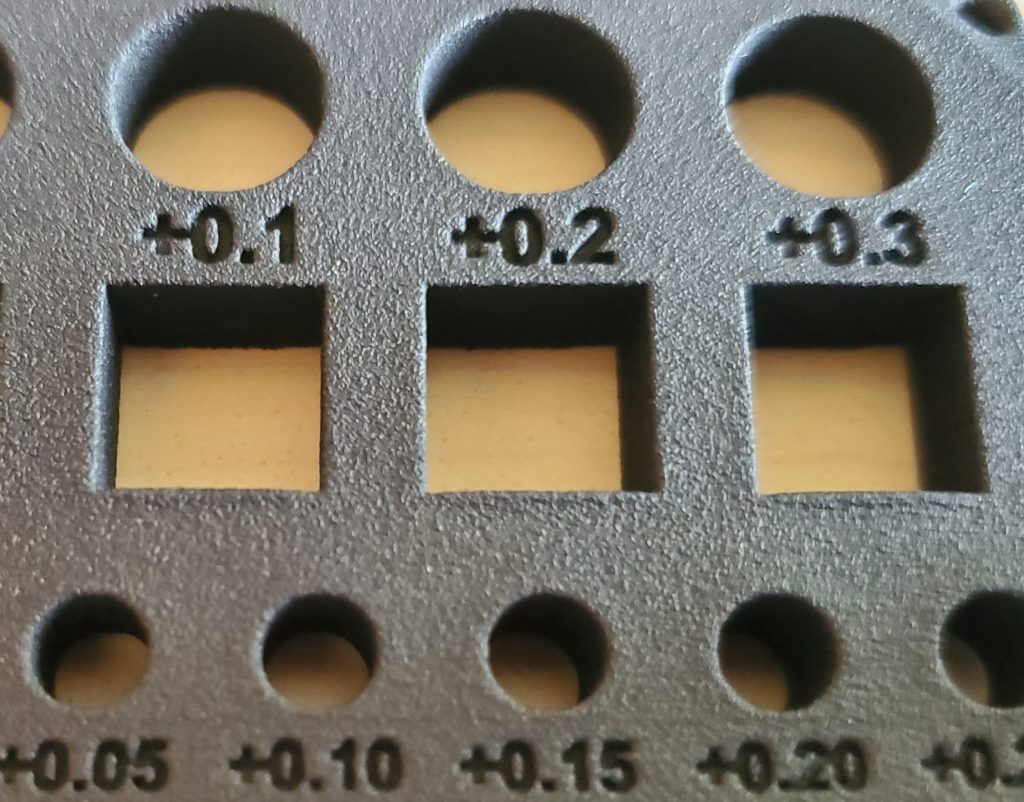
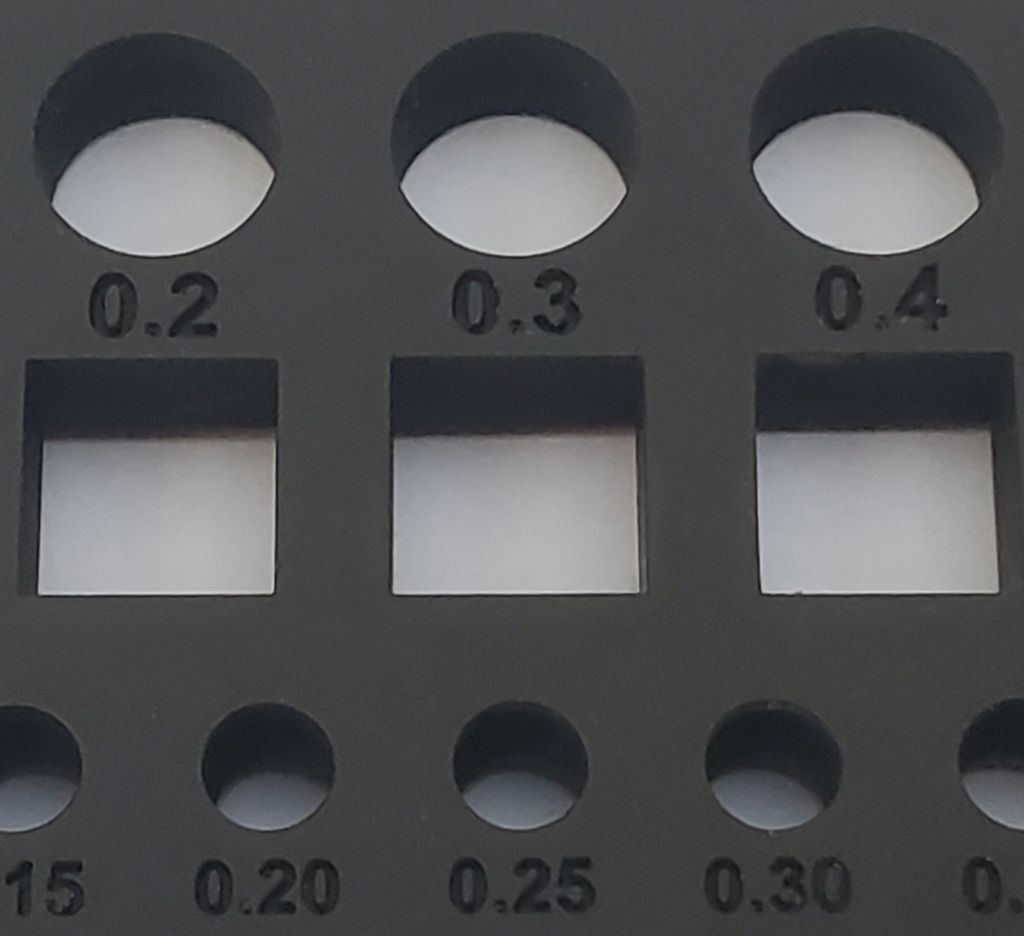
The fit testing sets consist of two parts, a pair of pegs, each with round and square ends. One peg has 5mm ends, the other is 10mm. The other component is a block with a range of holes of different sizes to test fit each peg. Printing these and testing which hole each peg fits in helps to determine how much extra margin your design needs to have parts fit together well. For example, if the peg fits comfortably in the +0.2mm hole, that means you’d better leave a 0.2mm gap in your design for the parts to work smoothly.
The first blocks I made ranged from -9.85 to 10.15 (in increments of 0.05mm) for the large holes, and -4.875 to 5.125 (with 0.025mm steps) for the small ones. I quickly discovered this wasn’t enough range for coarser printing processes, so I created additional blocks with wider ranges of 9.7 to 10.3 (9.75 to 10.25) and 0 to 0.6 (0 to 0.5). These doubled the increment steps of the previous blocks, from 0.05 / 0.025 mm to 0.1 / 0.05.
The last block works well for the coarsest printing technologies, and is the best place to start for basic FDM (fused deposition modelling) printers. The rendering above also shows some quarter-step peg sets I modeled for even more precise tests, but you won’t need those anywhere outside of a Swiss watch factory.
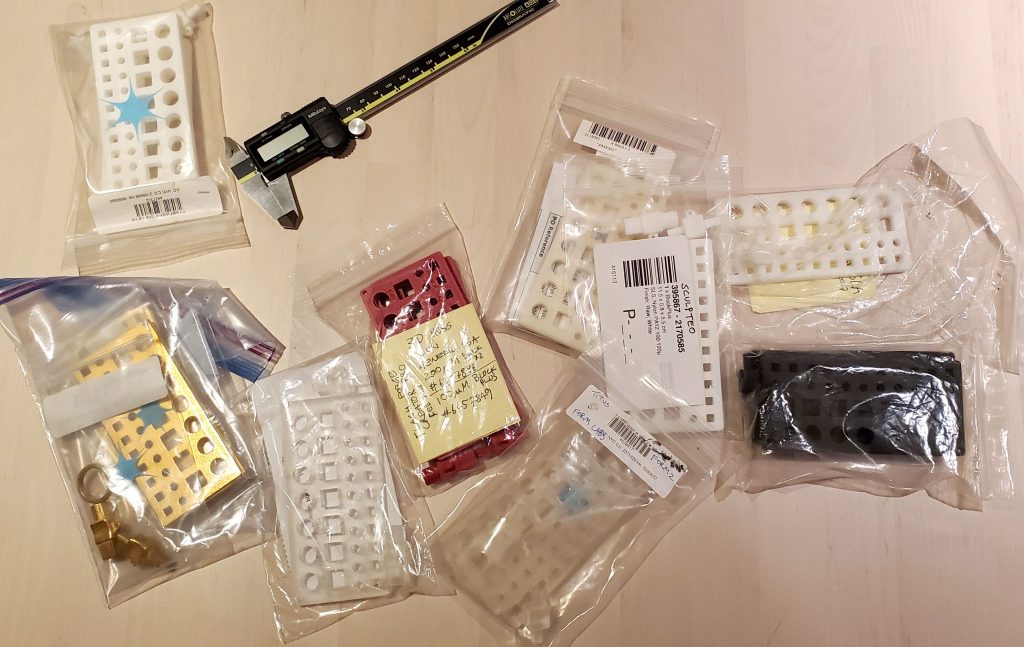
Over the past few years I’ve printed blocks and pegs with a number of different services, to get a feel for the accuracy and tolerances of each. Read on for a review of what I discovered.
Process Variations
Keep in mind that even with the same material and vendor, your experiences may still vary. A story: I printed a Slideways Cube puzzle with Shapeways regular plastic, using the 0.1mm tolerance (0.2mm gap between pieces) I’d determined for this material with the fit-testing block. The first one I got back fit together perfectly. I made another, but this time Shapeways didn’t provide the smooth polished surface I requested, so the pieces required some light sanding before working together smoothly.
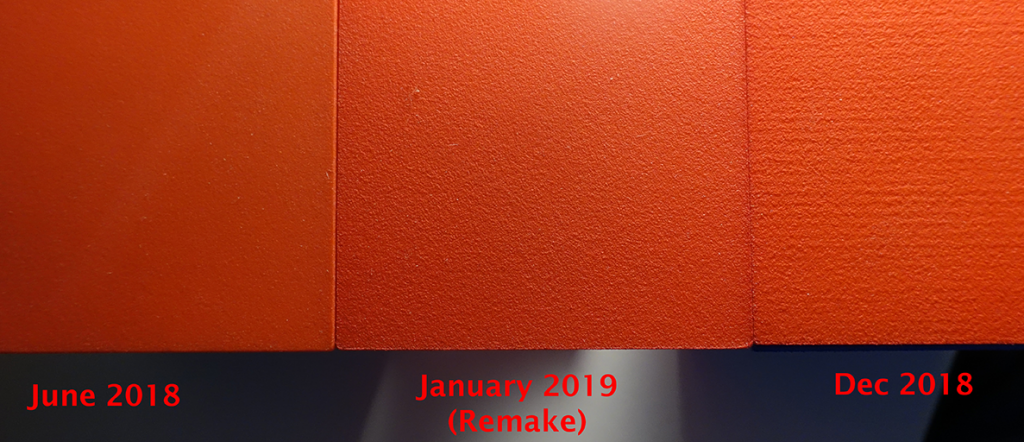
Since they hadn’t provided the smooth finished I requested, I asked Shapeways to re-make the puzzle. They did, but for some bizarre reason they made each of the three pieces a week apart, each arriving in a separate shipment. The fit was a disaster, and required serious amounts of sanding before they fit together. Because the pieces were made at different times, I suspect changes in machines or settings exaggerated the differences between the pieces.
The Sample Prints
Below is a set of brief reviews for each of the peg & block sets I’ve printed using a variety of services and materials. For each print, I’ve collected the following data:
- The Date is when I ordered the print, and the price is the cost for a block, 10mm & 5mm pegs, and shipping at the time I purchased the print. As you’ll see from the dates, I’ve been doing this over a period of years. Note several samples were ordered from 3D Hubs, back when it was an “Uber for 3D printers” service. Sadly, they discontinued this business. At the time it was a great way to try out various printing technologies.
- The Fit 10mm □ / ○ and Fit 5mm □ / ○ are the holes in the block the corresponding round / square pegs fit into. By “fit”, I mean the peg easily slides in without any significant force. This gives a basic idea of the printing margins you’ll need to create parts that fit together.
- Overall dim is the difference, length ✕ width ✕ height, between the measured size of the block and its CAD specification. Note this is approximate – with some processes, it’s not unusual to see variation in height or width from one end of the block to another.
- Large □ hole, Large □ peg, Small □ peg, are the differences (width ✕ height) between the 10mm square hole, the 10mm square peg and the small (5mm) peg, and the actual specification.
All measurements were made with the same pair of Mitutoyo calipers, with a rated accuracy of 0.02mm. And don’t forget, your experience with a given process may well be different – re-read my story about the puzzle pieces.
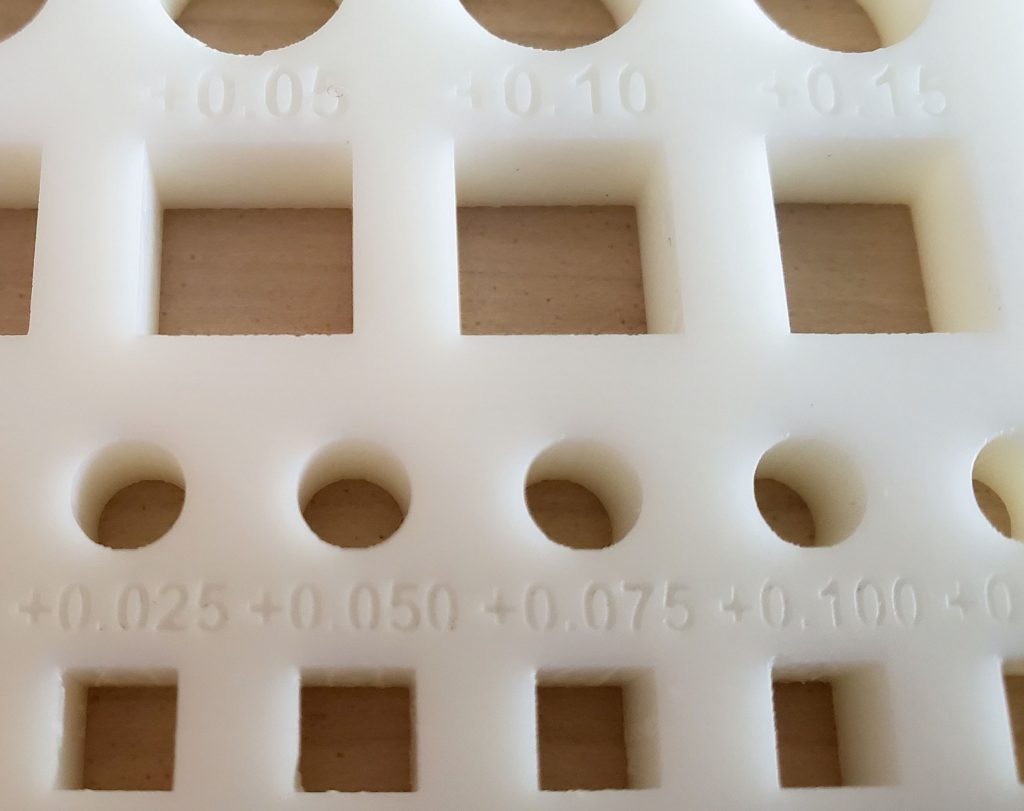
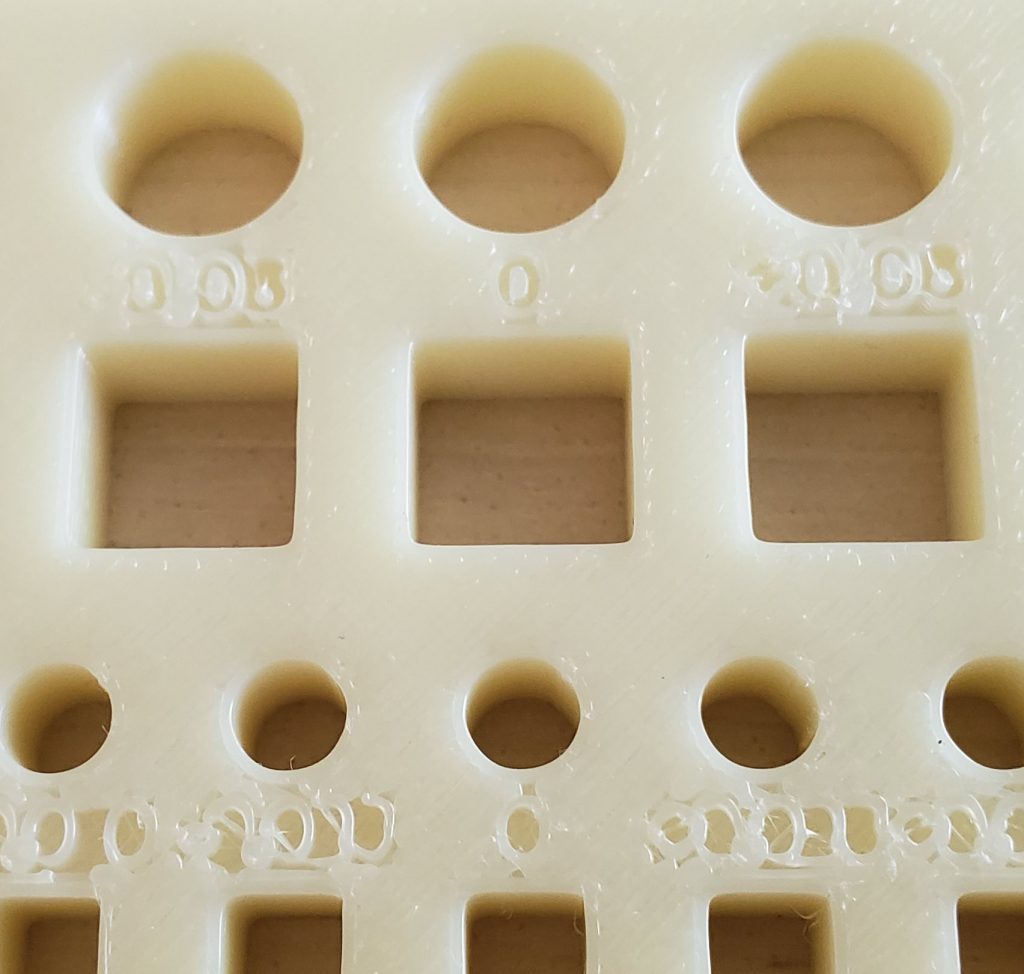
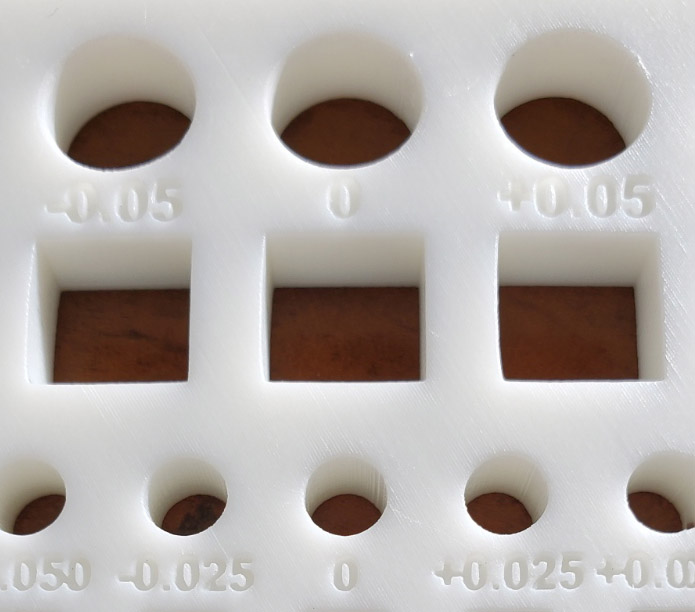
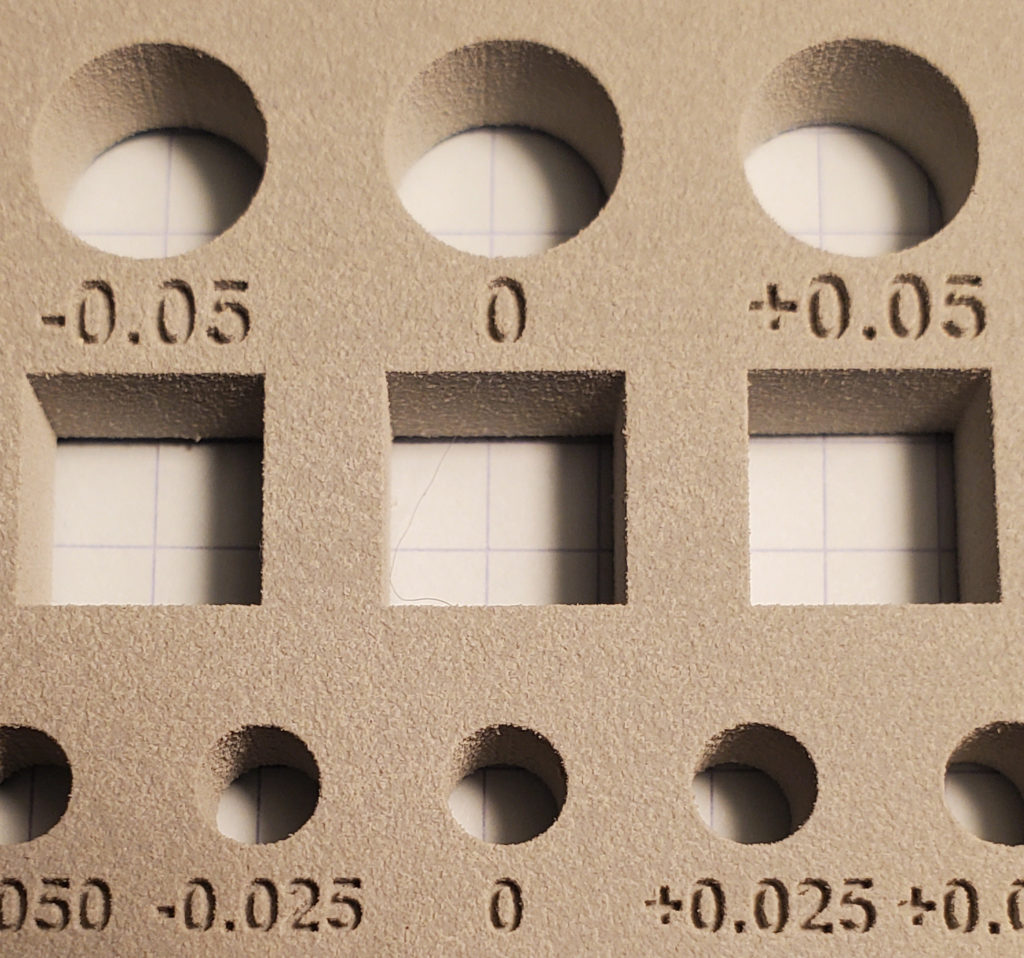
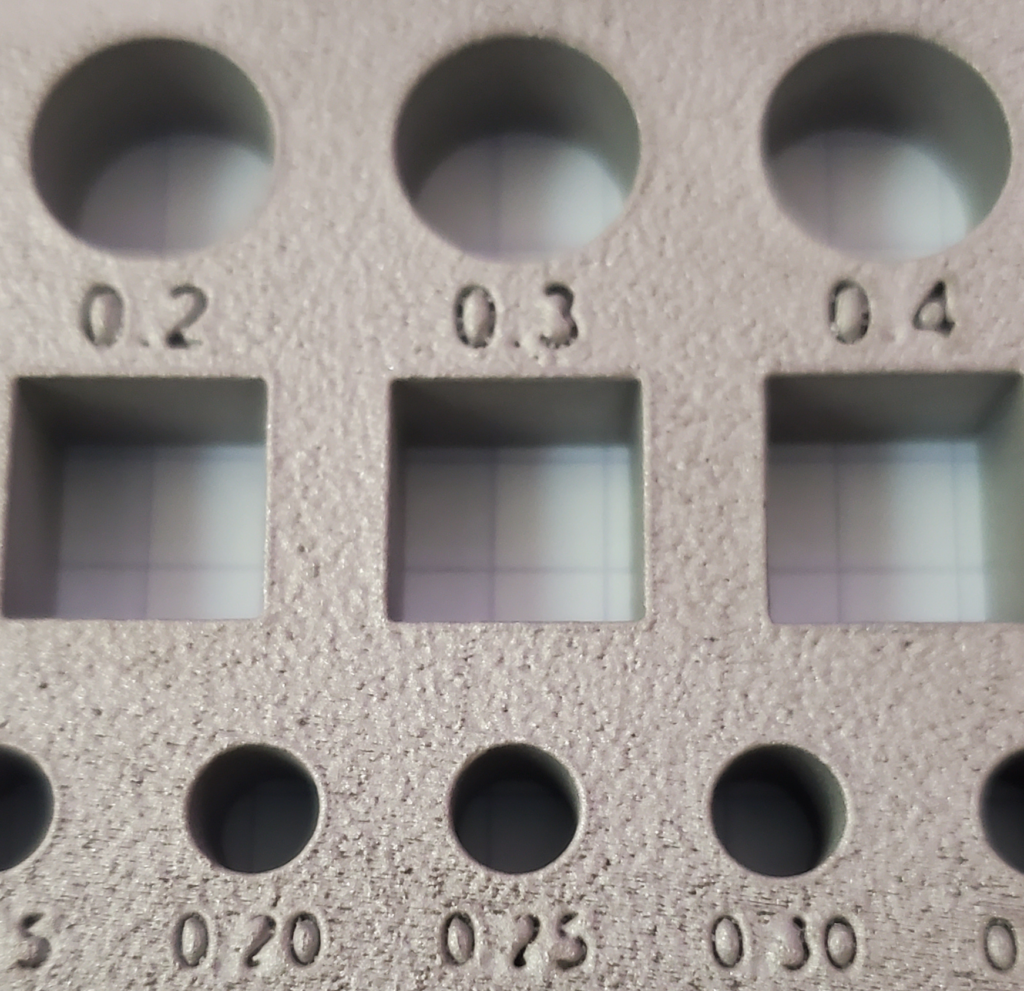
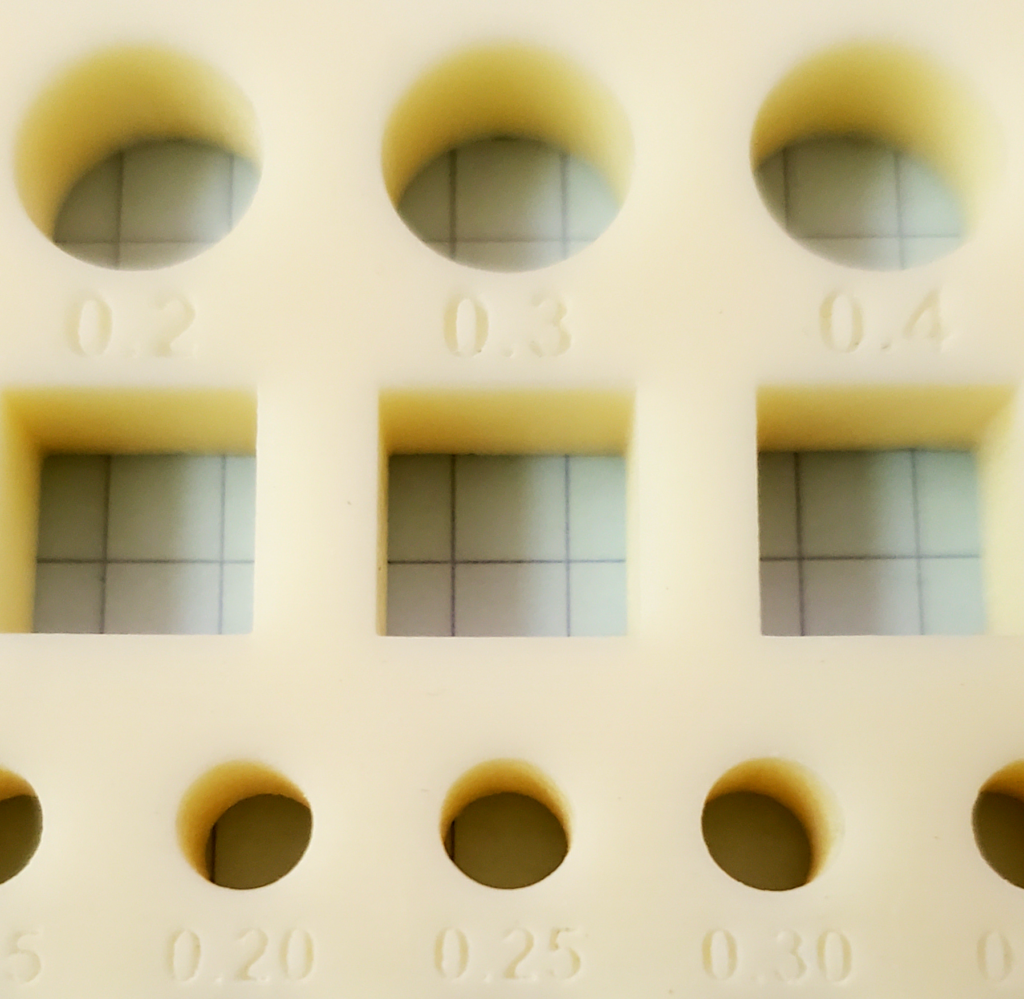
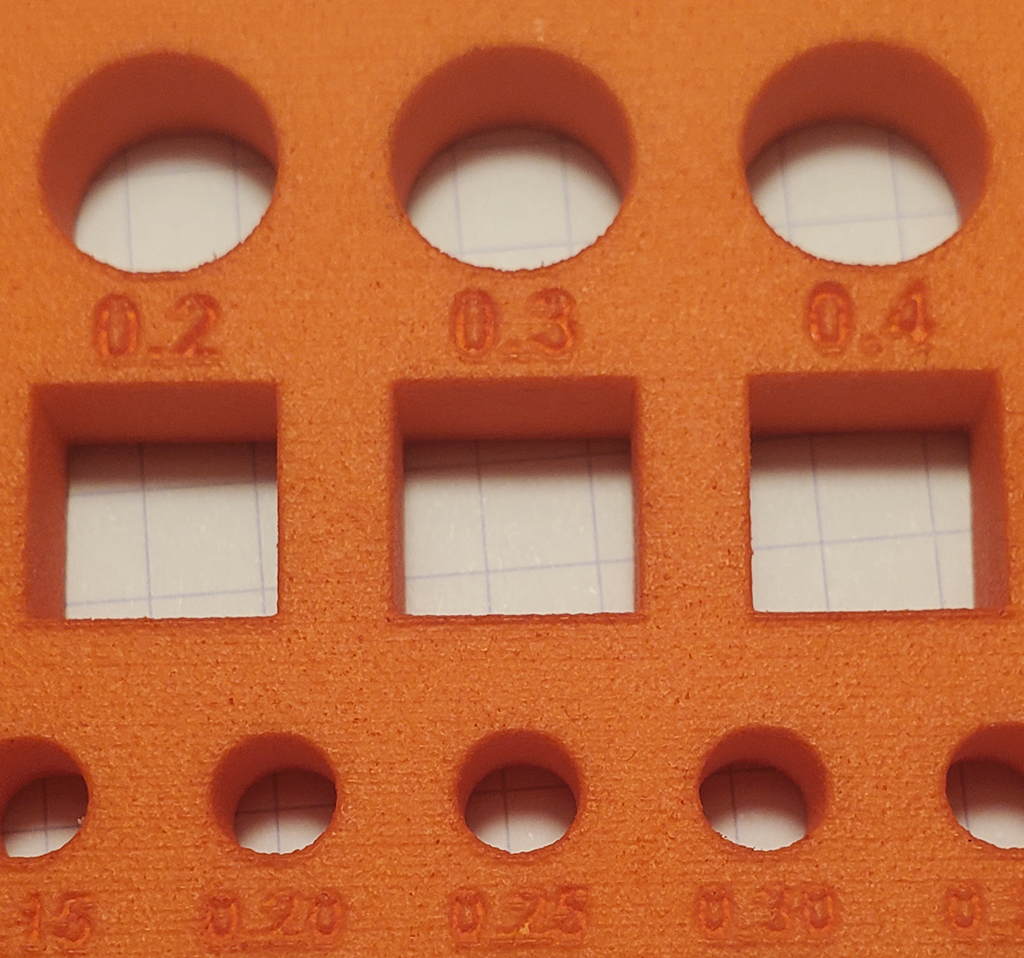
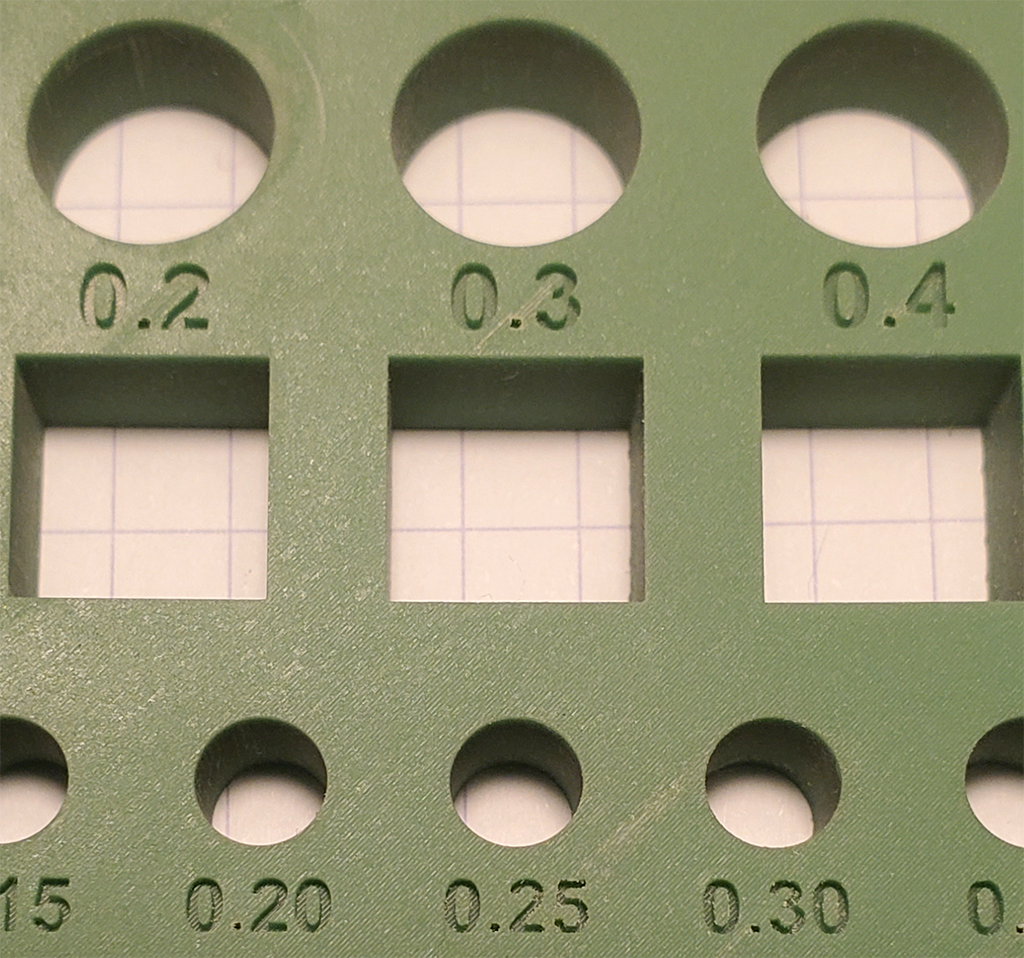
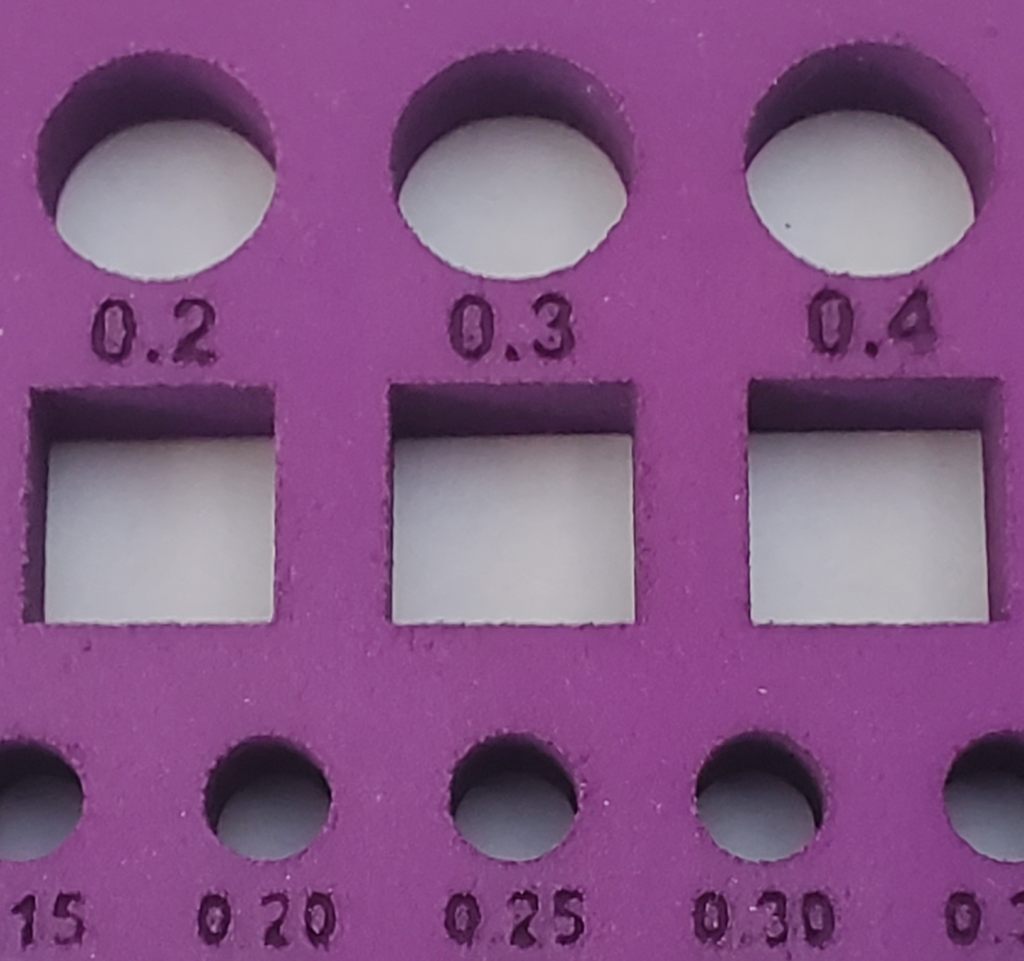
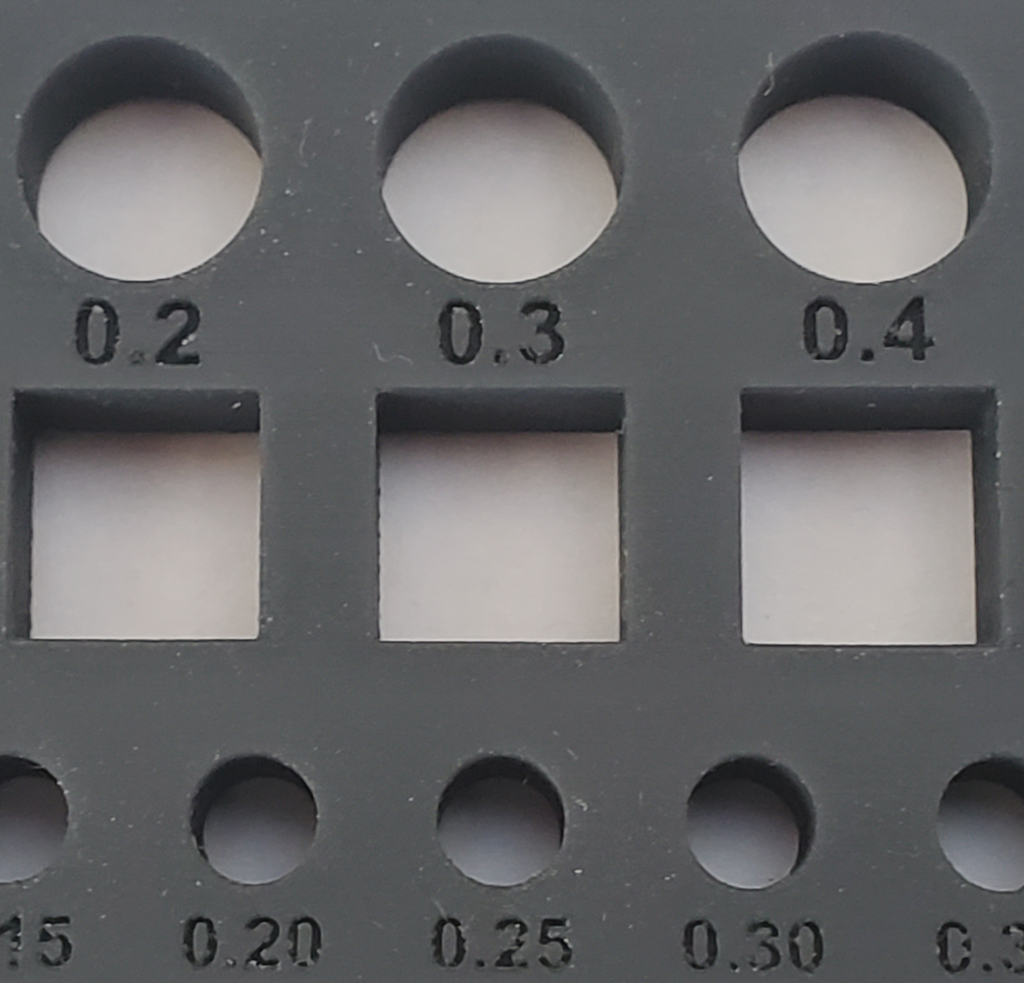
I’ve provided close-up photos of each sample, to provide a sense of the fit and finish you can expect. For scale, remember the larger holes are 10mm (0.4″) across.
Dirty SLA
Dirty SLA is a service out of China, producing one of the best sets I got back. Very smooth finish, very close fit. I recommend paying extra for the tracked shipping, as I’ve had shipments lost with the less expensive methods. This uses a Stereo lithography (SLA) process, where a liquid resin is hardened by exposure to a precisely positioned laser beam.
| Print Date | Price | Fit 10mm □ / ○ | Fit 5mm □ / ○ |
| Nov 2017 | $50.00 | -0.05 / -0.05 | -0.075 / -0.05 |
| Overall dim | Large □ hole | Large □ peg | Small □ peg |
| 0.21 ✕ 0.13 ✕ 0 | 0.13 ✕ 0.12 | -0.06 ✕ -0.02 | -0.02 ✕ -0.05 |
HP Jet Fusion 4200
The HP Jet Fusion process is somewhat similar to laser sintering, but relies on special fusion materials printed into the plastic medium. I used the 3D Hubs service to order the print. While the feel of the plastic is solid and looks good, the 10mm pegs only fit in the 0.6mm hole in my print – quite a margin.
| Print Date | Price | Fit 10mm □ / ○ | Fit 5mm □ / ○ |
| 6-July-2017 | $84.84 | 0.6 / 0.6 | 0.5 / 0.45 |
| Overall dim | Large □ hole | Large □ peg | Small □ peg |
| 0.56 ✕ 0.12 ✕ 0.19 | 0.07 ✕ -0.06 | 0.38 ✕ 0.03 | 0.25 ✕ 0 |
Sculpteo Nylon PA12

This was printed in Sculpteo‘s SLS (Selective Laser Sintering) Nylon. For some reason, it has the worst text rendition of any of the blocks I printed with an SLS process. Something to keep in mind if your print uses that.
| Print Date | Price | Fit 10mm □ / ○ | Fit 5mm □ / ○ |
| 16-May-2018 | $56.29 | 0.3 / 0.3 | 0.35 / 0.40 |
| Overall dim | Large □ hole | Large □ peg | Small □ peg |
| 0.12 ✕ 0.0 ✕ 0.14 | -0.14 ✕ – 0.10 | 0.05 ✕ 0.07 | 0.03 ✕ 0.06 |
Xometry – Ivory Solid ABS M30
Like the Flash Forge print, this is ABS FDM output. It’s similar to what you’d get with a high-end personal 3D printer. Note the peg fits are estimates, because I didn’t print the x2 block. The cost is high given the mediocre quality of the print.
| Print Date | Price | Fit 10mm □ / ○ | Fit 5mm □ / ○ |
| 28-Oct-2016 | $95.68 | 0.5? / 0.5? | 0.5? / 0.5? |
| Overall dim | Large □ hole | Large □ peg | Small □ peg |
| 0.02 ✕ -0.05 ✕ 0.25 | 0 ✕ -0.01 | 0.15 ✕ 0.08 | 0.24 ✕ 0.14 |
PCBWay Transparent Resin UTR-8100
This clear plastic print from PCBWay came out beautiful. Details are sharp and crisp, and the finish is excellent, just like a precision molded part. For parts to fit, a gap of 0.2 – 0.25 is needed. Shipping was $25.
| Print Date | Price | Fit 10mm □ / ○ | Fit 5mm □ / ○ |
| 22-May-2021 | $60.00 | 0.02 / 0.03 | 0.25 / 0.25 |
| Overall dim | Large □ hole | Large □ peg | Small □ peg |
| +0.31 ✕ +0.02 ✕ -0.15 | 0.04 ✕ 0.05 | 0.08 ✕ 0.07 | +0.17 ✕ +0.15 |
PCBWay Standard White Resin UTR-3100
For an inexpensive print, this came out great. Almost perfect fit, and details are very crisp. Shipping from Asia was $25.
| Print Date | Price | Fit 10mm □ / ○ | Fit 5mm □ / ○ |
| 22-May-2021 | $35.00 | -0.05 / 0.00 | -0.05 / 0.0 |
| Overall dim | Large □ hole | Large □ peg | Small □ peg |
| +0.05 ✕ +0.02 ✕ -0.15 | 0.34 ✕ 0.20 | -0.04 ✕ 0.03 | +0.07 ✕ -0.04 |
InkBit3D – Titan Epoxy 85
I discovered InkBit3D at the SIGGRAPH 2023 conference in Los Angeles. I was very impressed with the samples they had at the conference, so I requested a sample print of the Fit Testing block via their web site. They graciously sent two Fit Block sets printed with their process. The first is in their “Titan” Epoxy, the second was in Vulcan Soft Elastomer 30. The dimensional accuracy and detail on the Epoxy print is one of the best. The surface of the Epoxy print is a bit rough; I suspect if it was finished smooth the parts would be even more accurate. Keep in mind my calipers are only guarantied to ±0.02mm accuracy. I haven’t measured the Elastomer print, simply because it’s hard to get an accurate read with my calipers on a squishy material. This is one of the only prints able to resolve the tiny “jp” logo on the end of the 5mm square peg.
| Print Date | Price | Fit 10mm □ / ○ | Fit 5mm □ / ○ |
| 24-Aug-2023 | $104.10 | 0.15 / 0.05 | 0.050 / 0.025 |
| Overall dim | Large □ hole | Large □ peg | Small □ peg |
| +0.13 ✕ +0.09 ✕ +0.04 | 0.03 ✕ 0.06 | 0.04 ✕ 0.06 | +0.02 ✕ +0.04 |
CraftCloud / Hudson Creative Group – PLA / FDM
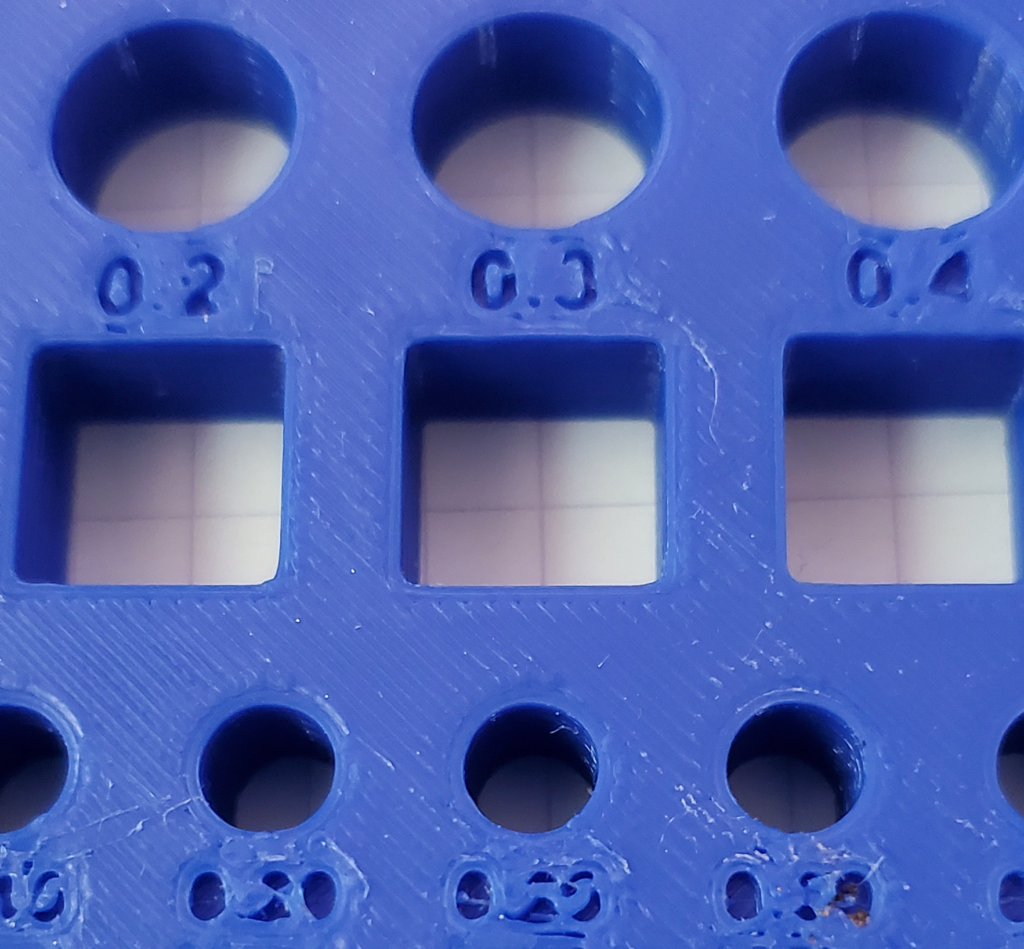
After the demise of Shapeways, I’ve started looking for another “go to” source for getting parts 3D printed. This was printed via CraftCloud. CraftCloud is similar to what 3DHubs was, a broker server for various companies offering 3D printing services. This print is a basic FDM / PLA print, similar to what you’d get off of a home 3D printer. The dimensional accuracy isn’t bad, and the cost is quite low, but fine detail like the text doesn’t come through well. The material (printed at 80% infill) has a very solid feel but a finish that screams “this is 3D printed”.
| Print Date | Price | Fit 10mm □ / ○ | Fit 5mm □ / ○ |
| 15-July-2024 | $27.00 | 0.3 / 0.2 | 0.2 / 0.2 |
| Overall dim | Large □ hole | Large □ peg | Small □ peg |
| -0.07 ✕ -0.1 ✕ +0.17 | -0.07 ✕ -0.05 | -0.04 ✕ +0.04 | +0.08 ✕ +0.08 |
CraftCloud / zone3Dplus – Aluminum Deburred
Zone3DPlus is a fabrication shop in China. Being on the other side of the planet, shipping is time consuming and more expensive ($24 of the price was getting the blocks shipped), but the printing costs are very reasonable. As with most metal printing processes, the dimensional accuracy is grim, even printing the block with the largest range, none of the pegs fit. To be fair to Zone3DPlus, they warned me the small text would not print clearly. I authorized them to print it anyway, and it’s still readable, but it fell below their specs for dimensional details. Unlike the metal prints I got from Shapeways, there was no warping – straight lines are straight.
| Print Date | Price | Fit 10mm □ / ○ | Fit 5mm □ / ○ |
| 15-July-2024 | $79.00 | NONE | NONE |
| Overall dim | Large □ hole | Large □ peg | Small □ peg |
| -0.3 ✕ -0.0 ✕ +0.2 | -0.3 ✕ -0.3 | +0.3 ✕ +0.3 | +0.3 ✕ +0.3 |
CraftCloud / zone3Dplus -Tough Resin Standard (Gray)
This resin print came out great. Accurate details, nice finish, very solid feeling material. Cost is very reasonable. The three pieces were $6.50 each (likely their minimum) with another $24 for shipping.
| Print Date | Price | Fit 10mm □ / ○ | Fit 5mm □ / ○ |
| 15-July-2024 | $44.00 | 0.1 / 0.3 | 0.15 / 0.3 |
| Overall dim | Large □ hole | Large □ peg | Small □ peg |
| 0.0 ✕ 0.1 ✕ +0.06 | 0.0 ✕ -0.05 | 0.0 ✕ -0.04 | 0.0 ✕ +0.05 |
PCBWay PA12 Nylon
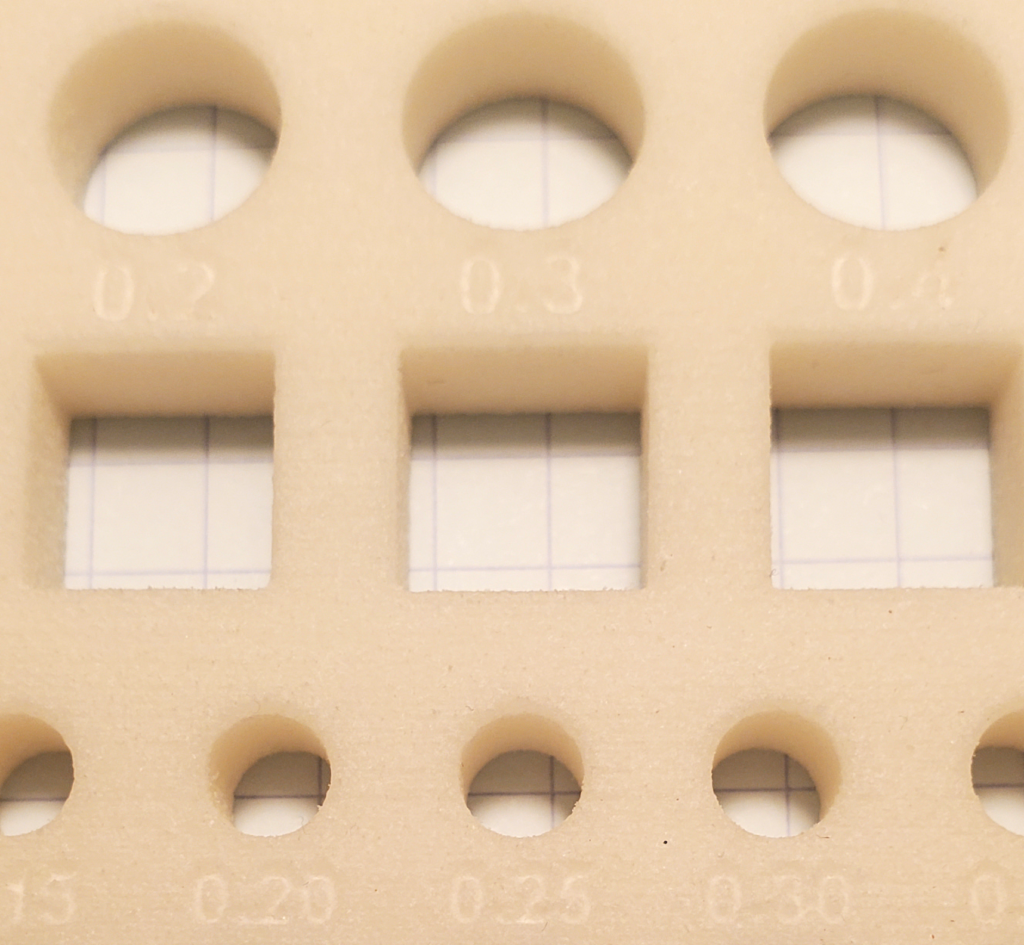
I tried PCBWay’s Nylon PA12 in hopes of finding a replacement for Shapeway’s “versatile plastic”. It’s not bad, but shipping from China is expensive ($27 of the cost is shipping). The default finish isn’t quite a smooth as Shapeway’s was.
| Print Date | Price | Fit 10mm □ / ○ | Fit 5mm □ / ○ |
| 15-August-2024 | $55.00 | 0.4 / 0.3 | 0.4 / 0.35 |
| Overall dim | Large □ hole | Large □ peg | Small □ peg |
| 0.0 ✕ 0.23 ✕ +0.1 | -0.2 ✕ -0.2 | -0.05 ✕ -0.05 | 0.0 ✕ 0.0 |
CraftCloud – Zelta3D SLS Nylon PA12
Zelta3D produces their prints in Singapore, and like PCBWay, the shipping is expensive ($38!). This is probably the closest the the Shapeways default plastic, and it is available in a variety of colors and finishes.
| Print Date | Price | Fit 10mm □ / ○ | Fit 5mm □ / ○ |
| 15-August-2024 | $57.00 | 0.5 / 0.5 | 0.45 / 0.45 |
| Overall dim | Large □ hole | Large □ peg | Small □ peg |
| 0.05 ✕ -0.12 ✕ +0.1 | -0.15 ✕ -0.2 | 0.2 ✕ 0.1 | 0.0 ✕ 0.1 |
CraftCloud / Advanced Additive Innovations – High Detail Resin MSLA
The finish on this is just fantastic. And unlike fabricators in Asia, the shipping cost is reasonable ($8). The accuracy is very high, and the details like the text marking come out looking like it came from a precision mold. The one downside is some amount of warping. The block isn’t perfectly flat, you can see a gap of perhaps 0.5mm if you hold a ruler across the top of the block, and one of the longer edges shows some rounding.
| Print Date | Price | Fit 10mm □ / ○ | Fit 5mm □ / ○ |
| 15-August-2024 | $32.00 | 0.2 / 0.2 | 0.1 / 0.1 |
| Overall dim | Large □ hole | Large □ peg | Small □ peg |
| 0.0 ✕ -0.3 ✕ +0.1 | -0.05 ✕ -0.05 | 0.2 ✕ 0.1 | 0.0 ✕ 0.1 |
Jawstec – SLS Nylon PA 2200
This is a good candidate to replace the standard Shapeways plastic, though it’s a bit on the pricey side. Shipped in about a week for $5.
| Print Date | Price | Fit 10mm □ / ○ | Fit 5mm □ / ○ |
| 9-September-2024 | $47.00 | 0.1 / 0.2 | 0.1 / 0.2 |
| Overall dim | Large □ hole | Large □ peg | Small □ peg |
| -0.75 ✕ -0.04 ✕ +0.1 | 0.0 ✕ 0.0 | -0.02 ✕ -0.03 | 0.01 ✕ -0.06 |
Jawstec – SLA HighTempTS
I was hoping Jawstec would be a good candidate for an US vendor for Nylon / Resin prints. However, the higher fabrication costs offset the higher shipping costs from Asia. Worse, for this part the delivery time was over six weeks! Not acceptable.
| Print Date | Price | Fit 10mm □ / ○ | Fit 5mm □ / ○ |
| 10-October-2024 | $41.00 | 0.3 / 0.2 | 0.35 / 0.25 |
| Overall dim | Large □ hole | Large □ peg | Small □ peg |
| 0.5 ✕ 0.4 ✕ -0.03 | -0.04 ✕ -0.04 | 0.05 ✕ 0.15 | 0.13 ✕ 0.21 |
JLCPCB – SLA JLC Black Resin
JLCPCB, along with PCBWay are the two large Chinese fabrication houses that cater to western customers (there are many more for Asian markets). Both offer a wide range of materials and services, with excellent finishes and quick turn around, even given the shipping from Asia. The price quoted here is artificially low due to a number of “new customer” discounts. Their fabrication costs, however, are very reasonable. The catch is the shipping, which usually starts at close to $20 (again, heavily discounted here). Without the discounts, the print probably would have run around $30 (shipped) or so – still cheaper than many US fabricators.
| Print Date | Price | Fit 10mm □ / ○ | Fit 5mm □ / ○ |
| 22-December-2024 | $16.00 | 0.1 / 0.2 | 0.1 / 0.15 |
| Overall dim | Large □ hole | Large □ peg | Small □ peg |
| 0.05 ✕ 0.1 ✕ -0.05 | 0.0 ✕ 0.05 | -0.05 ✕ -0.03 | 0.0 ✕ -0.03 |
Test Your Own Process
I’ve posted STL files for the pegs and blocks on Thingiverse. There are three different blocks:
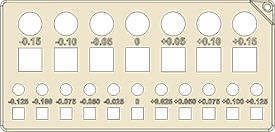 | The original block I designed has holes ranging from -0.15 to +0.15 of the 10mm base. Except for the most precise processes, this is too narrow a range. |
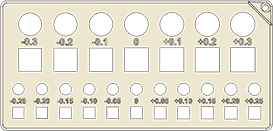 | The X2 block extends the range from -0.3mm to +0.3mm. Very few processes actually need the negative holes. |
 | The Plus block goes from 0 to +0.6mm. Start here for most FDM printers. |
I’m interested to hear what your experiences are with various processes – feel free to leave them in the comments.


